
So the next of the GBBO technical challenges is brought to you by the letter F. F is for Florentines, Mary Berry's recipe which formed part of biscuit week, and which I duly made this weekend.
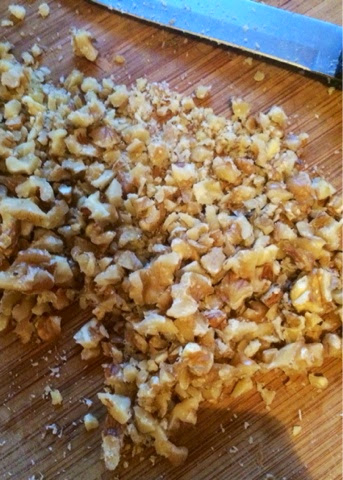
F is for fiddly fine chopping. What they don't show (and I assume they didn't have to do) on the programme, is that there is rather a lot of prep for this recipe. It includes finely chopped walnuts, finely chopped cherries, finely chopped almonds and finely chopped mixed peel. That's a lot of fine chopping which needs doing before you can get started, and which takes a little while, particularly when the almonds keep pinging across the kitchen every time you try to chop them.

F is for faith. I thought I would never manage to find mixed peel in the middle of August, however not only did I find it in Holland and Barrett on my lunch break (having googled "buy mixed peel" and striking lucky) I also found a great big tub of it reduced. Now I just need to find a recipe that requires another 400g of mixed peel - suggestions welcome. Side note - I hadn't realised initially that mixed peel and candied peel are the same thing so it's probably available in supermarkets too, I was just googling candied peel to begin with!

You also need to have faith that yes, that miniscule amount of ingredients in the bowl, is enough to make 18 (or 36 in my case) florentines. You need to have faith that yes, those tiny little mounds of gluey mixture will spread into something that resembles a florentine.

F is also for following the instructions about spacing out the mixture properly. If you place them too close to the edge of the tray you get these unusual quadrangle effects, which I do not feel would have passed muster with Mary.

The final F is that florentines are a faff. It may have been that it was a Friday night, it may have been that I had spent more time that I anticipated finely chopping fruit and nuts, but it's a recipe that calls for quite a lot of faffing around. It isn't particularly complicated, and you could do things quite easily in between the stages but when I started needing to temper chocolate at ten o'clock at night I have to admit I corralled The Husband to come and lend a hand.

Once you've done the chopping and made the mix, they take ten to fifteen minutes in the oven. If you were only making three trays that wouldn't be too tricky but because I doubled the recipe it became a bit convoluted swapping the trays in and out (the curse of batch baking strikes again). After that though the florentines need to cool for about half an hour.

Then you need to start tempering chocolate. By this point it was late, and the very specific temperatures included in Mary's recipe were putting me in a temper of my own, hence The Husband coming in to melt chocolate with me and agree that the technicalities of tempering were not imperative to an enjoyable florentine. Once you've melted the chocolate, you then have to wait until it cools and thickens enough to spread on the florentines without dripping through the biscuit. Finally, you then have to wait a good while longer until the chocolate has set enough for you to decorate the chocolate with the classic swirls.

Overall, I was pleased with how most of them turned out (a few of the deformed ones aside!). They were nicely crunchy, and a few even had the crucial lacing around the edge. They are wonderfully festive (there's another f), and it's quite a simple recipe but they are not fun to make when time is of the essence. If you fancy a bit of leisurely baking though, here is the recipe for 18 florentines, which doubles up easily!
Recipe: Florentines
(Recipe reproduced from BBC Food)
Ingredients
50g butter
50g demerara sugar
50g golden syrup
50g plain flour
25g glacé cherries
50g mixed peel
25g whole blanched almonds
25g walnuts
200g dark chocolate
Recipe
- Preheat oven to 180°C. Line three baking trays with greaseproof parchment.
- Finely chop the almonds, walnuts, mixed peel and cherries.
- Add the butter, sugar and syrup to a pan and cook on low heat until butter is melted. Remove pan from the heat and add the nuts, mixed peel, cherries and flour, stirring mixture well.
- Divide mixture between the baking trays, placing six equal teaspoons of mixture on each tray, spaced well apart.
- Bake in the oven for 8-12 minutes until mixture has spread and has turned golden brown in colour.
- Lift out trays and leave florentines to cool and harden before lifting onto a wire rack to cool completely. (Mary notes in the recipe that if you have greased the tray rather than using paper, the florentines can harden too much to remove. If that happens, soften again in oven for a few moments.)
- Melt half of the chocolate in a heatproof bowl over a pan of simmering water (if you want to temper properly - the temperatures are given in the link above!). While the chocolate is melting, finely chop the remaining chocolate (that's right - more fine chopping!). Lift the bowl off the water and add the chopped chocolate, stir until fully melted.
- Once the chocolate has cooled and thickened slightly, spread on the back of the florentines and leave face down to cool on a wire rack.
- When the chocolate has set slightly, use a fork to decorate the chocolate with a zigzag pattern, and leave to cool completely.
- Once cool, the florentines can be stored in an airtight container.
I feel your pain! Great idea to bake along with Bake a Off though, I may emulate this idea next year! These really do look beautiful Katie, I bet they tasted delicious! X
ReplyDeletethey were good, although the majority went into work with The Husband! Would definitely be a good Christmas bake.
DeleteI have to admit, florentines have always intimidated me! But you really did a great job with them...late nights and all!
ReplyDeleteThey were a lot more successful than I thought they would be when I spooned out the mixture!
DeleteMelting and spreading is my kind of level - and I think the texture is better if you don't have everything chopped to dust! I still love the programme, but it is making me realise that some stuff is dramatised (see this weeks ciabatta!!) to such an extent that it doesn't translate when you're trying to recreate them at home. I'm enjoying trying new things though, and if anything, other recipes will feel a lot simpler afterwards! Thanks so much for visiting, and for such an interesting comment. Do pop back!
ReplyDeletethey look fab! I want one right now x
ReplyDeletethey didn't last long at all! x
Delete